SnapRoamer.com – Natural light remains an indispensable resource in photography, offering dynamic possibilities that artificial lighting often cannot replicate. Mastering the use of natural light enables photographers to capture images with authentic color, subtle textures, and compelling depth, whether shooting portraits, landscapes, or indoor scenes. Employing natural light effectively requires understanding its types—such as backlight, open shade, or diffused light—and adapting camera settings like aperture priority mode and exposure compensation to control exposure and balance shadows. The nuanced interplay of environmental factors, subject positioning, and reflective surfaces profoundly shapes the photographic outcome, demanding both technical proficiency and creative insight.
The quality of natural light fluctuates with time of day, weather, and surroundings, making it essential for photographers to anticipate and manipulate these variables. For instance, shooting in open shade provides soft, even illumination that reduces harsh shadows on subjects, ideal for portrait photography. Conversely, backlighting can produce dramatic rim lighting or silhouettes, adding artistic flair but necessitating exposure adjustments to retain subject detail. Reflectors and natural surfaces serve as practical tools to bounce light and fill shadows, broadening control over ambient illumination without artificial sources. Applying these techniques alongside precise camera configurations, such as adjusting white balance presets and employing exposure compensation, equips photographers to harness natural light’s full potential across diverse settings.
Types of Natural Light and Their Visual Impact
Natural light manifests in several distinct forms, each imparting unique characteristics to photographs. Backlighting occurs when the light source is positioned behind the subject, creating rim light that highlights edges and can form striking silhouettes when exposure is not compensated. This technique enhances subject separation from backgrounds but requires careful metering to avoid underexposure of the main subject. Side lighting, with light falling from approximately a 90-degree angle to the subject, accentuates texture and depth by casting shadows that reveal surface details—crucial for emphasizing dimensionality in outdoor portraiture or still life.
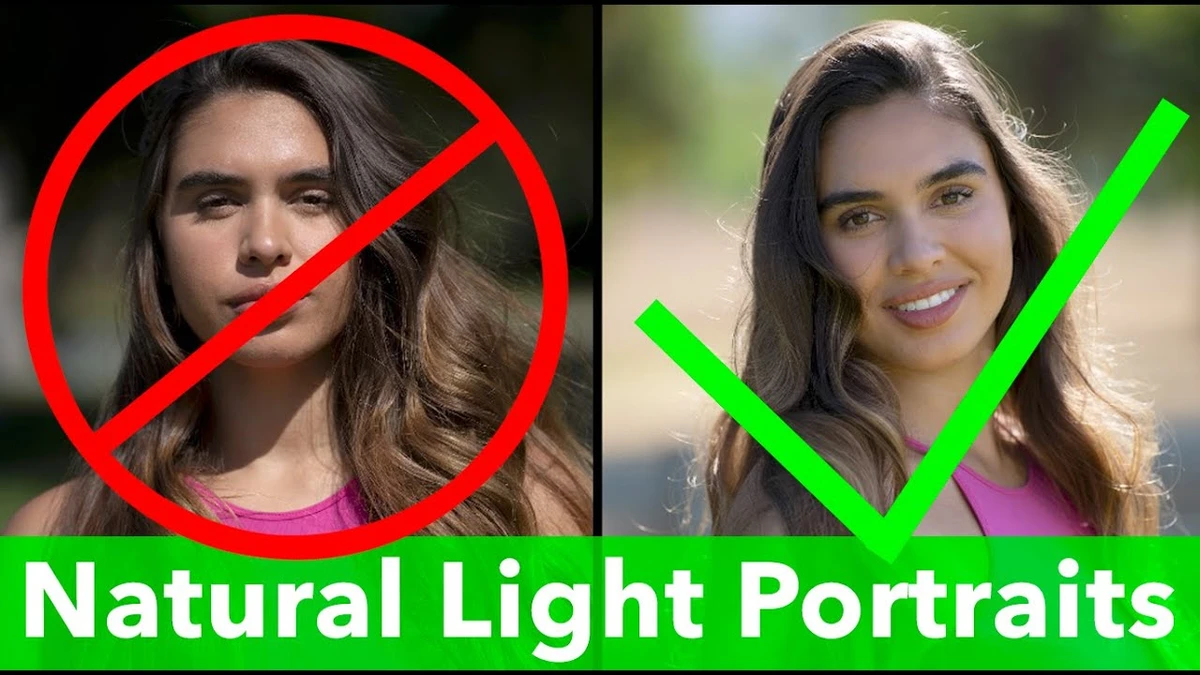
Diffused light, often present on overcast days, scatters sunlight through clouds, producing soft, shadowless illumination that is flattering for skin tones and reduces contrast in scenes. This form of natural light is favored for even exposure and color consistency but may lack dramatic highlights. Direct sunlight, especially during midday, delivers intense, high-contrast light that can generate harsh shadows and blown highlights; while challenging, it offers opportunities for creative use of contrast and texture. Open shade, created by subject placement in shaded areas exposed to ambient light but shielded from direct sun, delivers uniform, gentle lighting that minimizes shadows and highlights, making it optimal for portrait photography requiring natural skin tone rendering.
Techniques for Controlling Natural Light in Photography
Manipulating natural light effectively hinges on strategic subject positioning relative to the sun and environmental elements. Positioning subjects at approximately 45 degrees to the light source balances illumination across the face, enhancing depth without harsh shadows. Framing subjects within light-controlled spaces—such as narrow alleys, under tree canopies, or between buildings—allows photographers to isolate or diffuse light, controlling contrast and ambient exposure. These environments often function as natural reflectors, bouncing light from walls, pavements, or foliage to fill shadows subtly.
Reflectors, both professional and improvised (white boards, light-colored walls, or even ground surfaces), serve as essential accessories to redirect light and soften shadows. For instance, a reflector placed opposite the sun’s direction can illuminate shaded areas on the subject’s face, enhancing catchlights and reducing unwanted contrast. Avoiding lens haze, a common pitfall when shooting toward direct sunlight, involves shielding the lens with hoods or natural objects to prevent flare that degrades image clarity and contrast.
Camera Settings Optimized for Natural Light Photography
Aperture Priority mode remains a preferred setting for natural light photography, granting photographers control over depth of field while allowing the camera to adjust shutter speed for proper exposure. This flexibility is vital when natural light intensity shifts rapidly due to moving clouds or changing angles. Exposure compensation is critical when shooting backlit or silhouetted subjects; increasing exposure by +1 to +2 stops can recover detail lost in shadows while preserving background highlights.
Adjusting white balance presets from Auto to Daylight or Cloudy enhances color fidelity, particularly indoors where mixed lighting often skews color temperature. Selecting a moderate aperture (f/4 to f/8) balances sharpness and depth, while ISO settings should remain as low as possible (ISO 100–400) to minimize noise in well-lit conditions. In low-light natural environments, increasing ISO cautiously preserves image quality without introducing excessive grain.
Practical Applications: Outdoor and Indoor Natural Light Techniques
On overcast days, the diffused natural light provides consistent, soft illumination that minimizes shadows and highlights, ideal for portraiture with natural skin tones. Photographers can exploit this by shooting in open spaces or near reflective surfaces to maximize ambient fill. Conversely, the harsh midday sun, often deemed unfavorable, can be harnessed creatively for landscapes and dramatic portraits by emphasizing shadows and textures, especially when paired with controlled positioning and exposure adjustments.
Indoors, maximizing window light involves positioning subjects near the light source while minimizing artificial lighting, which can clash with natural light’s color temperature. Using curtains or diffusers softens window light, reducing contrast and preventing blown highlights. Photographers should adjust white balance away from Auto mode to Daylight or Cloudy presets to maintain accurate color rendition in natural lighting conditions.
Common lighting mistakes include shooting directly into harsh sunlight without mitigations, which leads to lens flare and loss of subject detail, or selecting backgrounds that either reflect excessive light or create distracting shadows. Careful composition and awareness of environmental light contributions mitigate these issues and contribute to balanced, professional-quality images.
Advanced Techniques and Creative Uses of Natural Light
Using shadows and contrast effectively can infuse images with drama and dimensionality. Photographers can experiment with filtered light passing through foliage or semi-transparent objects, producing patterned shadows that add texture and visual interest. Reflector placement is crucial to these effects; positioning reflectors to bounce light into shaded areas creates nuanced highlights and balanced contrasts.
Natural bounce alternatives include using light-colored surfaces like sandy ground, pale walls, or water bodies, which reflect ambient light softly and evenly. This technique is especially valuable in outdoor portraiture, where artificial reflectors may be impractical. Employing these advanced methods requires understanding light behavior and environmental context to elevate the creative and technical quality of natural light photography.
| Natural Light Type | Visual Characteristics | Best Uses | Camera Settings Tips |
|---|---|---|---|
| Backlight | Rim light, silhouettes, high contrast | Artistic portraits, rim lighting, dramatic effects | Use exposure compensation +1 to +2 stops; aperture f/4–f/8 |
| Side Light | Emphasizes texture, depth, shadows | Portraits, still life, textured landscapes | Aperture priority mode; moderate aperture for depth |
| Diffused Light | Soft, even light; minimal shadows | Portraits, product photography, indoor shoots | White balance Daylight/Cloudy; low ISO |
| Direct Sunlight | Harsh shadows, high contrast | Landscapes, dramatic portraits, texture emphasis | Use lens hood; adjust exposure carefully |
| Open Shade | Soft, even lighting; reduces harsh shadows | Portrait photography, close-ups | Use reflectors for fill; aperture priority mode |
FAQ
What is the best time of day to shoot with natural light?
The golden hours shortly after sunrise and before sunset provide soft, warm light with minimal harsh shadows, ideal for most natural light photography. However, open shade and overcast conditions can also deliver flattering light throughout the day, especially for portraits.
How can I avoid harsh shadows when using natural light?
Positioning subjects in open shade or using reflectors to bounce light into shadowed areas helps soften shadows. Avoid shooting during midday sun without diffusion or shade, and consider framing subjects under tree canopies or between structures to control directional light.
Why is aperture priority mode recommended for natural light photography?
Aperture priority mode allows control over depth of field while the camera automatically adjusts shutter speed for proper exposure. This adaptability is crucial as natural light intensity changes rapidly, ensuring consistent exposure without compromising creative control.
How do I manage exposure when shooting backlit subjects?
Backlit subjects often appear underexposed due to strong light behind them. Using exposure compensation to increase exposure by +1 to +2 stops restores subject detail while maintaining background highlights. Spot or manual metering can further refine exposure accuracy.
Can natural light be used effectively indoors?
Yes, maximizing window light indoors by positioning subjects near windows and minimizing artificial lighting creates natural, flattering illumination. Adjusting white balance presets to Daylight or Cloudy improves color accuracy, and using diffusers reduces harsh contrasts from direct sunlight.
Harnessing natural light in photography demands a blend of technical knowledge and creative experimentation. Photographers who actively adapt to environmental lighting conditions, refine camera settings, and employ practical tools such as reflectors gain the ability to produce images with natural vibrancy and compelling depth. As advancements in camera technology continue, integrating these foundational natural light techniques will remain vital for creating authentic and visually striking photography.
For further expert insights and practical tips on natural light photography, consult Photo Education by Daniel and Digital Photography School.