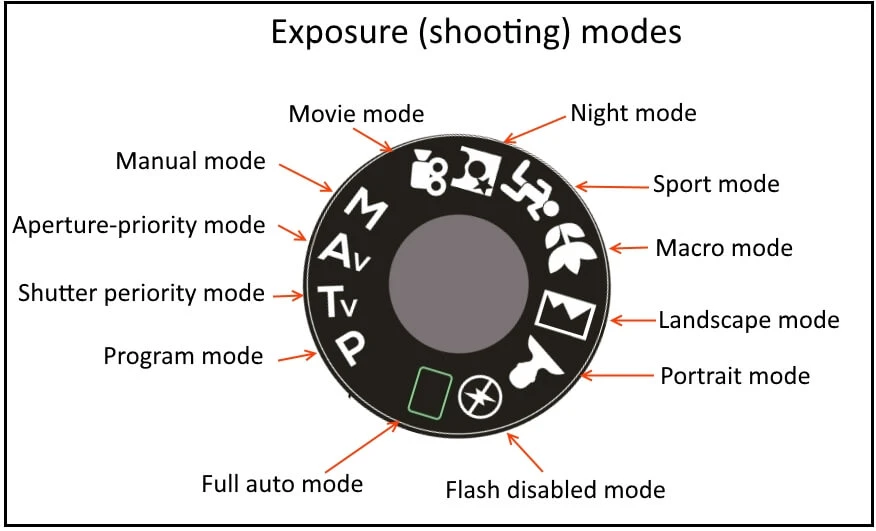
SnapRoamer.com – smartphone photography shooting modes range from automatic presets to advanced manual controls, each designed for specific creative needs. For instance, Manual Mode lets users adjust ISO, shutter speed, white balance, and focus manually, enabling effects like motion blur or precise color correction. In contrast, modes like Portrait simulate shallow depth of field by isolating the subject, while HDR captures multiple exposures combined for balanced highlights and shadows, enhancing scene detail automatically.
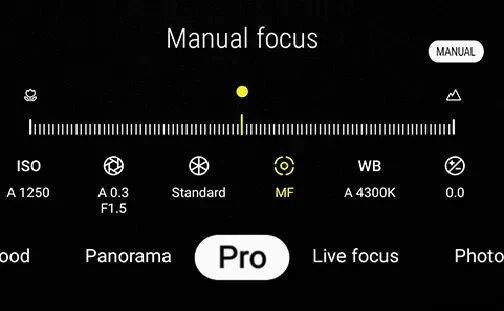
Manual Mode, often called Pro Mode, allows adjustment of ISO, shutter speed, white balance, and focus, providing DSLR-like control over camera settings — ExpertPhotography
How do manual and pro shooting modes differ across popular smartphone brands and OS versions?
Manual and Pro modes provide DSLR-like controls but vary in UI and features across smartphones. For example, iPhone 14 Pro and 15 offer extended ISO and shutter speed ranges, while Samsung S22 and S23 differ in menu navigation and RAW support. Knowing these differences helps users maximize manual photography on their devices.
Apple’s iPhone 14 Pro and 15 models support Manual Mode through third-party apps like ProCam, offering ISO ranges from ISO 34 to over 1600 and shutter speeds from 1/8000 to 30 seconds. The Pro mode UI on iPhones allows adjustment of white balance, focus, and exposure compensation via intuitive sliders within the app interface. A notable feature is the ability to shoot in RAW format, which preserves uncompressed image data for advanced editing.
Samsung’s Galaxy S22 and S23 models feature manual controls accessible under Camera > More > Pro Mode. The shutter speed range extends from 1/8000 second to as slow as 10 seconds, but the S23 introduces an improved in-app histogram for exposure monitoring. Unlike some iPhones, Samsung’s default camera app supports RAW capture natively, but users must enable it via Settings > Formats > RAW and JPEG control. However, a failure mode often reported is unresponsive ISO sliders when switching lenses, requiring a restart of the camera app.
Android devices vary significantly. Some, like Motorola models, offer shutter speeds as slow as 1/4 to 1/6 second in manual mode, suitable for long exposures, while others lack manual control entirely or restrict access to RAW. In many stock camera apps, manual mode is hidden under “Pro” or “Expert” settings, accessible by swiping or tapping the gear icon. Counterintuitively, manual mode on some phones disables HDR and AI enhancements, which can degrade image quality if users expect automatic optimization.
iPhone Manual Mode Features
iPhone Pro models use third-party apps like ProCam or Halide to unlock manual controls. ISO and shutter speed can be finely tuned, including shutter speeds up to 30 seconds for astrophotography. Focus is adjustable via a dedicated slider, and white balance presets cover Kelvin temperatures from 2500K to 10000K. The app’s UI places these controls on the bottom toolbar for quick access during shooting.
Samsung One UI Manual Mode Differences
Samsung’s Pro Mode features ISO from 50 to 3200, shutter speeds from 1/8000 to 10 seconds, and manual focus. The camera app’s menu path is Camera > More > Pro Mode. Users can toggle RAW capture under Settings > Formats. A limitation is that manual focus sometimes fails to lock properly in low light, causing blurry images. The interface includes a histogram and exposure compensation slider but does not allow changing aperture, which remains fixed.
Android Variations and Limitations
Android manual modes depend on manufacturer and app. Motorola supports shutter speeds from 1/4 to 1/6 second, but some stock apps do not allow RAW capture. Many Android phones lack proper manual white balance controls. Users often resort to third-party apps like Open Camera or ProShot (costing $1.99) to overcome these restrictions. However, not all apps support all camera hardware features, and switching modes can disable manual controls unexpectedly.
What are common failure modes and troubleshooting tips in smartphone manual shooting modes?
Typical problems faced in manual mode include unresponsive sliders, difficulty locking focus, and image blur caused by slow shutter speeds or camera shake. For example, slow shutter speeds slower than 1/60 second require stabilization to avoid blur. Solutions include adjusting ISO and shutter speed settings carefully, using tripods, and activating gridlines within the camera app, which Adobe recommends for composing shots precisely using the rule of thirds.
- Focus and Exposure Challenges: Manual focus can be difficult in low light, leading to blurry images. Increasing ISO to around 1600 improves exposure but introduces grain; this trade-off is often necessary. Users should enable gridlines via camera app settings for better composition, as per Adobe’s guidance.
- Avoiding Camera Shake: Slow shutter speeds below 1/60 second cause motion blur unless stabilized. Using a tripod and remote shutter control, such as Bluetooth remotes, reduces shake effectively. Adobe recommends these accessories for sharp night shots and self-portraits.
- Correcting Perspective Distortion: Tilting the phone up or down causes distortion, as Linda Holt Creative explains: “As soon as you tilt your phone either downward or upward, you will get perspective distortion.” Holding the phone level and on the same plane as the subject prevents this issue.
Additional troubleshooting includes restarting the camera app when manual controls become unresponsive and avoiding switching between manual and auto modes too quickly, as this can reset settings unexpectedly. DIY Photography advises to “shoot deliberately rather than constantly. Think about settings before each photo. This conscious practice builds skills faster than mindless shooting.”
Focus and Exposure Challenges
Manual focus sliders may not always respond well in dim environments, often causing blurry results. Increasing ISO to 1600 or 3200 brightens images but at the cost of added noise. Users should balance ISO and shutter speed carefully, as fast shutter speeds (e.g., 1/500 second) freeze motion but reduce light intake.
Avoiding Camera Shake
Shutter speeds slower than 1/60 second almost always require stabilization. Tripods paired with remote shutter buttons prevent the common failure mode of shaky images. Remote shutter controls trigger the camera without physically touching the device, eliminating vibrations.
Correcting Perspective Distortion
Perspective distortion results from improper phone angles. Keeping the phone level with the subject plane avoids this distortion. Using gridlines helps align shots accurately, reducing the risk of skewed perspectives.
How can advanced shooting scenarios like astrophotography and long exposure be achieved with smartphone modes?
Smartphones can capture astrophotography and long exposure images using manual mode by setting long shutter speeds, low ISO, and stabilizing the phone with a tripod. Multi-frame HDR combines exposures for detailed night shots, expanding creative possibilities beyond standard auto modes.
For long exposure, Motorola’s manual mode allows shutter speeds from 1/4 to 1/6 second, enabling silky water effects and light trails. Setting ISO to 100 minimizes noise. A steady tripod is essential to avoid blur. Multi-frame HDR mode on iPhones takes three exposures and merges them for balanced highlights and shadows, useful in low-light night scenes.
Astrophotography requires shutter speeds of several seconds and ISO settings between 800 and 1600 to capture stars without excessive grain. Some apps offer interval shooting for stacking multiple frames to enhance detail. Failure modes in this scenario often include star trails from too long exposure or blurry images from unsteady hands.
Long Exposure Settings
Use ISO 100 and shutter speeds between 1 and 4 seconds to capture motion blur in water or light trails. Tripods are indispensable for stabilization. Adjust white balance manually to counter mixed lighting.
Using HDR for Night Photography
HDR merges multiple exposures to create vivid night photos with balanced dynamic range. On iPhones, HDR mode captures three images at different exposures and composites them, improving shadow and highlight detail.
Stabilization Techniques
Tripods and remote shutters prevent camera shake during long exposures. Smartphone gimbals also assist handheld shooting by steadying the device dynamically.
What role do AI and computational photography play in smartphone shooting modes compared to manual controls?
AI and computational photography frequently adjust exposure, focus, and noise reduction automatically in modes like Portrait and Night Mode. For example, Portrait Mode on iPhones applies algorithmic background blur to isolate subjects. However, Motorola notes that switching to panorama or Portrait disables manual settings, since “the digital processing for those modes calculates optimal values.” This shows how AI often overrides manual control to optimize images without user input.
AI-driven modes like Portrait and Night Mode use machine learning to adjust exposure, focus, and noise reduction without user input. For example, the iPhone’s Portrait Mode applies background blur algorithmically, enhancing subject isolation. Computational photography blends multiple frames to improve detail and dynamic range, which manual mode disables on some devices.
Counterintuitively, manual mode sometimes restricts AI enhancements, resulting in less processed but more editable raw images. This trade-off is a conscious choice for photographers seeking professional control rather than convenience.
When AI Overrides Manual Settings
Auto modes and Portrait modes apply AI corrections automatically. Motorola’s support notes that switching to panorama or Portrait disables manual settings, as “the digital processing for those modes calculates optimal values.”
Benefits and Limitations of Computational Photography
Computational methods enhance images in auto mode but limit manual control. Users must choose between convenience and customization. Some phones allow partial manual input combined with AI algorithms.
How do smartphone accessories enhance manual shooting modes?

Accessories like tripods, remote shutter controls, gimbals, and clip-on lenses improve stability, reduce shake, and expand creative options in manual mode. These tools enable sharper images, better low-light shots, and new perspectives such as macro and telephoto photography.
- Tripods and Remote Shutters: Tripods stabilize the phone, essential for shutter speeds slower than 1/60 second. Remote shutter controls prevent camera shake by allowing shutter release without physical contact.
- Gimbals for Stability: Smartphone gimbals provide dynamic stabilization, smoothing handheld video and photos, especially useful in motion or low light.
- Lens Attachments: Clip-on lenses like the AMIR 3-in-1 HD Camera Lens ($17 USD) add telephoto, wide-angle, and macro capabilities, vastly expanding creative options beyond the default 24mm-26mm smartphone lens.
Tripods and Remote Shutters
Tripods hold the phone steady for long exposures. Remote shutter controls, including Bluetooth remotes, trigger the camera without physical contact, reducing blur. Adobe recommends these for night photography and self-portraits.
Gimbals for Stability
Smartphone gimbals stabilize handheld shots by compensating for hand movements, enabling smoother motion and sharper images in low light.
Lens Attachments
Macro lenses allow close-up photography with vivid detail, while telephoto lenses bring distant subjects closer without quality loss. The AMIR 3-in-1 lens kit is a popular, affordable option for smartphone users.
What are the key differences between auto mode and manual/pro mode in smartphone photography?

Auto mode uses AI to automatically set ISO, shutter speed, focus, and white balance, typically selecting shutter speeds between 1/60 and 1/160 second for quick snapshots. Manual or Pro mode grants users full control, allowing ISO settings from as low as 34 up to 1600 or higher, and shutter speeds adjustable from 1/8000 second up to 30 seconds, enabling creative effects like long exposures or precise focus adjustments. This level of control is ideal for photography requiring artistic input or challenging light conditions.
| Feature | Auto Mode | Manual/Pro Mode |
|---|---|---|
| Control over ISO | Automatic adjustment by AI | User sets ISO manually (e.g., ISO 34 to 1600+) |
| Shutter Speed | Automatically selected (typically 1/60 to 1/160s) | Manually adjustable from 1/8000s to 30s |
| Focus | Auto-focus with AI enhancement | Manual focus slider for precise control |
| White Balance | Auto white balance | Manual white balance adjustment (Kelvin scale) |
| Image Quality | Processed with AI, HDR, noise reduction | RAW capture option for uncompressed images |
| Use Case | Quick snapshots, casual photography | Creative photography, low-light, long exposure |
| Failure Modes | Less control can cause poor exposure in tricky light | Requires practice; risk of blurry images if misconfigured |
Auto mode prioritizes speed and convenience, applying computational photography techniques instantly to optimize photos. Manual/Pro mode requires deliberate adjustment of settings but delivers professional-level control and flexibility, including the ability to shoot in RAW format for advanced editing.
Speed vs Creative Control
Auto mode captures images instantly with AI managing settings, while manual mode demands users adjust ISO, shutter speed, and focus sliders to create specific artistic effects.
Image Quality Differences
Manual mode supports shooting in RAW format, providing uncompressed files that retain maximum detail and allow extensive post-processing. Auto mode compresses and processes images, limiting editing latitude.
Use Cases for Each Mode
Auto mode is best for everyday photos and fast-moving subjects. Manual mode excels in controlled environments, night photography, and experimental shots requiring precise exposure and focus settings.